(教程) 静态网站部署3:如何使用 Github Actions 自动化部署
Github Actions 只需要写一个 yml 文件放到 .github/workflows/ 目录就可以了。


这篇文章讲什么?
上一篇文章 (教程) 静态网站部署2:如何更新
讲的是用 Makefile 里面写 yarn build 和 aws cli 命令进行更新,这种是全本地执行的方式。
那么问题来了,能不能更进一步,git push 之后自动部署,让 Github Actions 帮我们 yarn build 和 aws cli 进行更新?
前提要求
请自行阅读 Github Actions 的基本介绍和教程,这里不再重复,因为看了下网上很多。
包括阮一峰也写了一篇 Github Actions 入门教程文章。
如何实现?
新建一个文件 .github/workflows/deploy-production.yml
(这个文件名随意写,也可以写 haha.yml 或者 hello.yml 之类的)
文件内容如下:
name: Deploy Production
on:
  push:
    branches:
      - main
      # 限定只有 push main 分支的时候执行
jobs:
  deploy:
    runs-on: ubuntu-latest
    env: # 环境变量
      AWS_S3_BUCKET_NAME: test-static # 要部署到哪个 S3 桶
      AWS_CLOUDFRONT_DISTRIBUTION_ID: E2MMHBBY1OKGKP # CloudFront Distribution ID
      AWS_REGION: cn-north-1 # cn-north-1 是 AWS 中国区北京
    steps:
      # 先 pull 代码下来 https://github.com/actions/checkout
      - uses: actions/checkout@v2
        # with:
          # ref: c7921b3903f16c09f33d5064b04a3c1ac539200b # 如果需要 rollback 到之前的版本(比如线上出 bug 了需要紧急回滚),可以指定 commit hash, 比如这样
      - run: aws --version
      - run: ls # 简单看一下当前目录有什么文件
      - run: tree . # 详细输出文件树
      - run: node -v # 看 node 版本
      - run: npm --version # 看 npm 版本
      - run: yarn --version # 看 yarn 版本

      # yarn install 需要缓存,不然每次都跑有点慢
      # https://docs.github.com/en/actions/guides/caching-dependencies-to-speed-up-workflows
      # https://github.com/actions/cache/blob/main/examples.md#node---yarn
      - name: Get yarn cache directory path
        id: yarn-cache-dir-path
        run: echo "::set-output name=dir::$(yarn cache dir)"
      - uses: actions/cache@v2
        id: yarn-cache # use this to check for `cache-hit` (`steps.yarn-cache.outputs.cache-hit != 'true'`)
        with:
          path: ${{ steps.yarn-cache-dir-path.outputs.dir }}
          key: ${{ runner.os }}-yarn-${{ hashFiles('**/package.json') }}
          restore-keys: |
            ${{ runner.os }}-yarn-
      - run: yarn install # 安装依赖

      - run: yarn build # 构建 production 文件

      # 把文件同步到 S3
      - uses: jakejarvis/s3-sync-action@master
        with:
          args: --acl public-read --follow-symlinks --delete
        env:
          AWS_S3_BUCKET: ${{ env.AWS_S3_BUCKET_NAME }}
          # 如果想在本地看 key id 和 access key,运行: cat ~/.aws/credentials
          AWS_ACCESS_KEY_ID: ${{ secrets.AWS_ACCESS_KEY_ID }}
          AWS_SECRET_ACCESS_KEY: ${{ secrets.AWS_SECRET_ACCESS_KEY }}
          AWS_REGION: ${{ env.AWS_REGION }}
          SOURCE_DIR: 'dist'  # optional: defaults to entire repository # 这里是部署哪个目录到 S3

      # 配置 AWS 身份, 否则后面的 aws cloudfront 命令跑不了
      - name: Configure AWS Credentials
        uses: aws-actions/configure-aws-credentials@v1
        with:
          aws-access-key-id: ${{ secrets.AWS_ACCESS_KEY_ID }}
          aws-secret-access-key: ${{ secrets.AWS_SECRET_ACCESS_KEY }}
          aws-region: ${{ env.AWS_REGION }}

      # 让 CloudFront 更新
      - run: aws cloudfront create-invalidation --distribution-id "${{env.AWS_CLOUDFRONT_DISTRIBUTION_ID}}" --paths '/*'
以上有挺多注释的,这里就不细讲了。
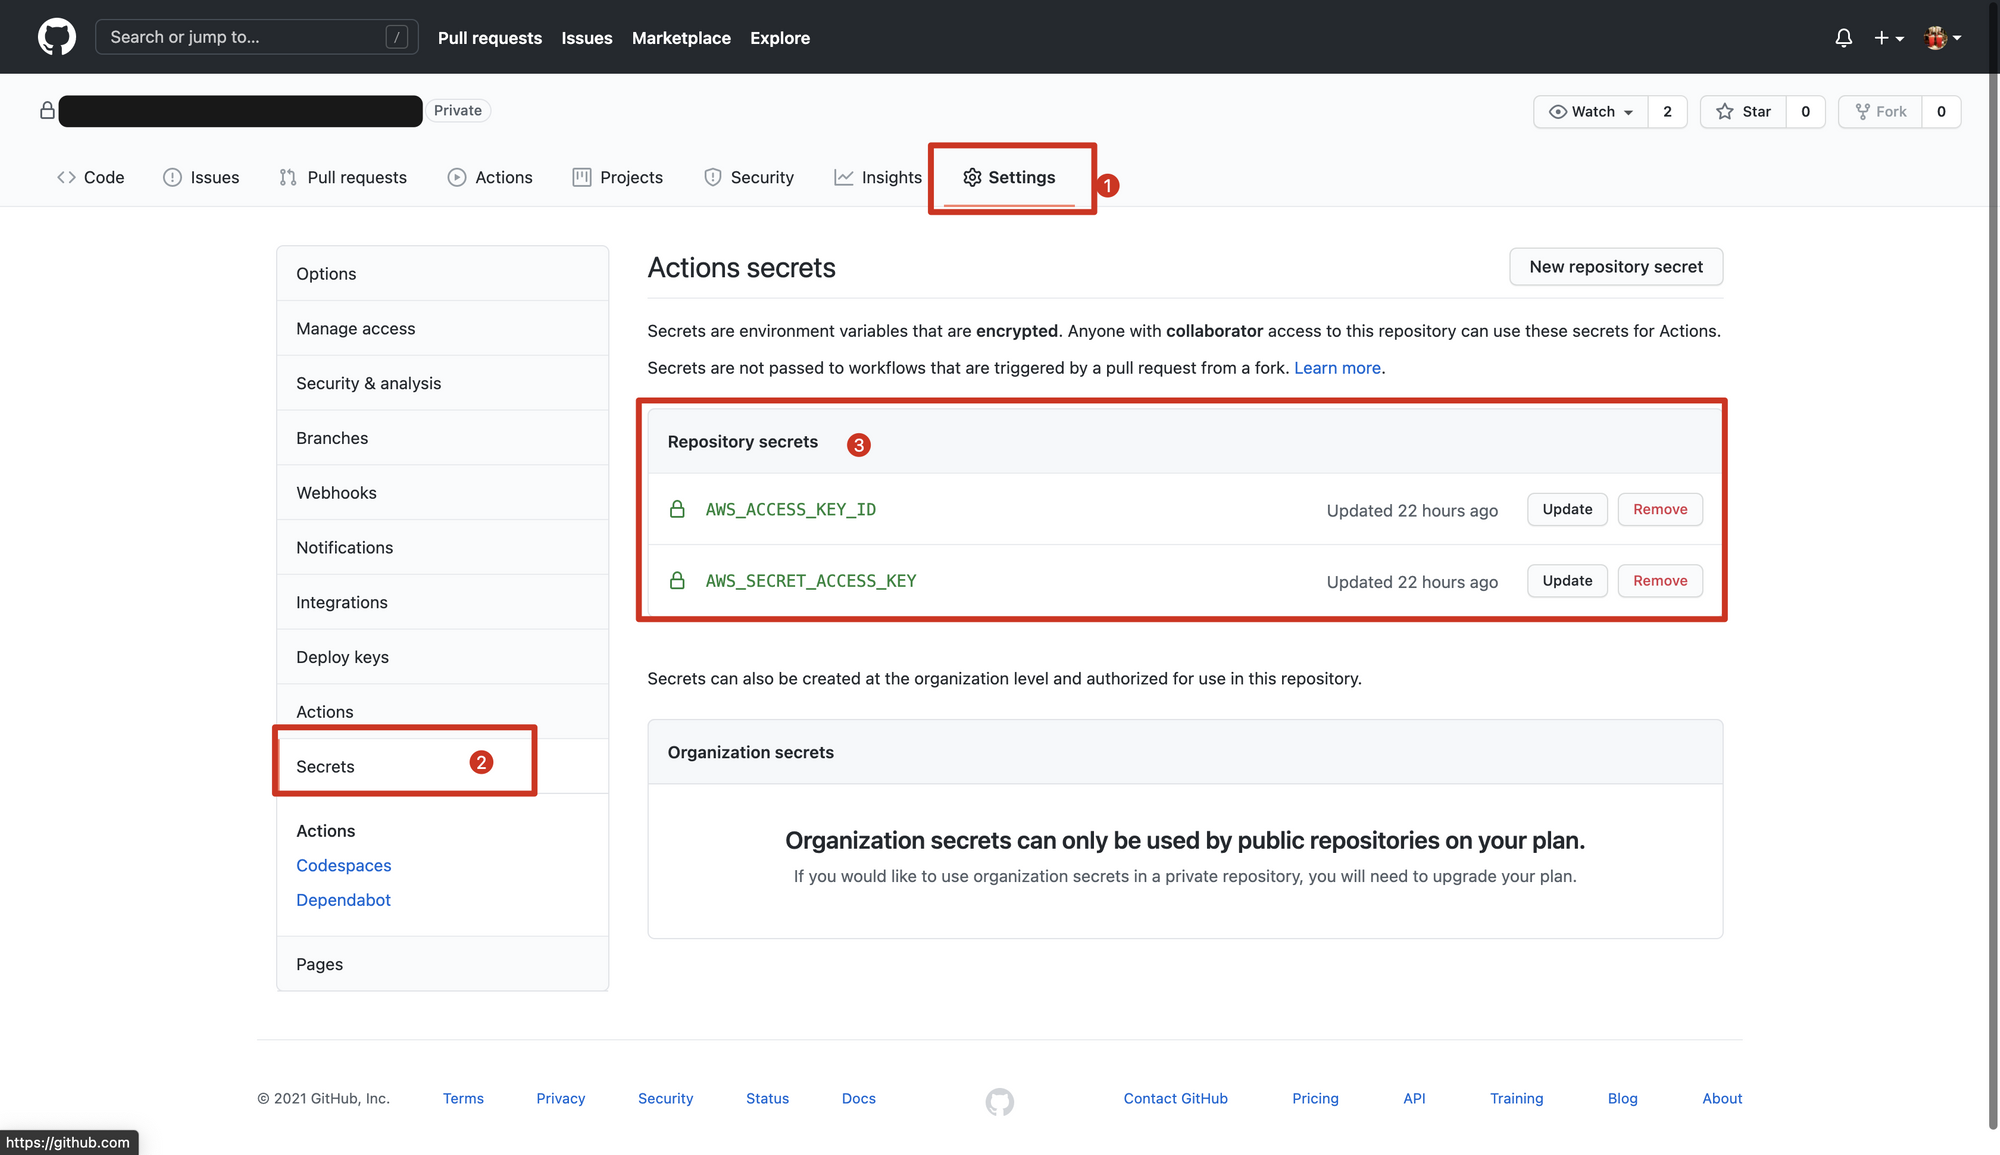
注意,要在仓库的设置里加上 secret,
AWS_ACCESS_KEY_ID
AWS_SECRET_ACCESS_KEY
因为 yml 文件里用到了这俩,所以必须加上。
文件写好之后,commit+push 即可。会开始执行的。